7 Easy Steps For Making A Website With Bootstrap
Bootstrap is one of the most popular open-source, front-end frameworks available for responsive web development. It can be used on various platforms including WordPress to create highly-attractive and fast interfaces. The numerous advantages of WordPress alone encourage people to convert HTML template to WordPress theme or migrate from other platforms. When both the tools of web development are combined, it will help create a mobile-friendly website which loads quickly. In this tutorial, we will list the steps involved in making a website with Bootstrap. We will be using Bootstrap 4 for creating a landing page in this step by step guide.
Also Read: 15 best rooting apps for Android for you
Also Read: 15 best rooting apps for Android for you
A user must have knowledge of HTML and CSS to be able to use Bootstrap. We will create a coming soon page with social sharing buttons through the following steps:
1. Download And Install Bootstrap 4
The first step is to download the Bootstrap 4 files and install them. There are three ways to do the installation. You can do this through the node package manager (npm) by using this command:
npm install bootstrap
A CDN can also be used for the same purpose and the following link must be inserted between the head tags:
<link rel=”stylesheet” href=”https://maxcdn.bootstrapcdn.com/bootstrap/4.0.0/css/bootstrap.min.css” integrity=”sha384-Gn5384xqQ1aoWXA+058RXPxPg6fy4IWvTNh0E263XmFcJlSAwiGgFAW/dAiS6JXm” crossorigin=”anonymous”>
The library can be installed and used locally also. Extract the CSS and JS files and save them on your system.
2. Create The CSS And Index Files
We will now create the stylesheet and index file for our project. You will need a code editor for writing the program for these two files. Make sure that you have one installed on your system before you move ahead. Create a blank file and name it as style.css. This must be saved in the CSS folder.
Visit the Bootstrap website and access its documentation. There you will find the starter template. We have provided it here in the below image:
Create a blank page for the index file and paste the code after copying it from the above image. Now, remove the hello world h1 from this code.
3. Linking The Index File With The Stylesheet
The index file must now be linked with the blank stylesheet created in the earlier step. Insert the default stylesheet given below in the head section.
<link rel=”stylesheet” href=”css/style.css”>
Name the index file as index.html and save it in the same location where you extracted and saved Bootstrap’s CSS and JS files. You can view the page in a browser now.
4. Adding The Background Image For The Page
We chose a landing page to demonstrate a simple method for making a website with Bootstrap. This page does not need a scrolling feature, menus or some other elements. Only an image is being added to the background to improve its appearance. An HTML tag will be used for this purpose.
html, body {
background:url(‘../img/bg.jpg’) center center no-repeat;
height: 100%;
background-size:cover;
}
The above code needs to be added to the style.css file. Once the change has been made and saved, the image will be visible in a browser.
5. Inserting The Logo And The Intro Text
The next step is to insert a logo in the website. Add the code in the body tags of the index.html file as displayed in the image given below.
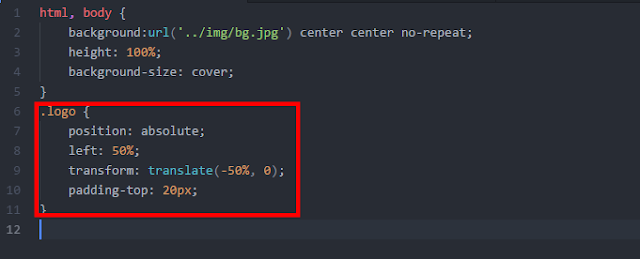
Now the logo must be aligned correctly so that it is displayed in the center of the page. For this, the stylesheet needs to be modified.
See the code enclosed in the rectangular box in the image above and make modifications accordingly in your stylesheet. Now, move back to the index.html file to add the code for displaying the intro text. This code will be added below the code for the logo in the body tags. The following code needs to be added:
<section id=”intro”>
<div class=”container”>
<div class=”row”>
<div class=”col-md-12″>
<p>we will be available shortly.</p>
</div>
</div>
</div>
</section>
Now the intro text needs to be changed into CSS and the following code will do the needful:
#intro p {
color: white;
text-align:center;
font-family: ‘Just Another Hand’, cursive;
font-size:1.8em;
}
6. Install An Icon Toolkit
In order to display social sharing buttons in an attractive manner, we need some vector icons. Bootstrap comes with numerous icons but they lack in visual appeal. The problem can be solved by downloading an icon toolkit. In this tutorial, we will install Font Awesome which allows users to modify images according to their requirements. Access the Font Awesome website and download its stylesheet. Decompress the files, remove the version numbers and save it in the same location where you have your bootstrap installation files.
<link rel=”stylesheet” href=”font-awesome/css/font-awesome.css”>
Use the above code to link the new stylesheet with the index file.
7. Add Social Sharing Icons
Let us now see how Facebook, Instagram, Twitter, and Google+ icons will be added in a container to the website. This is the HTML code which will do the needful.
<section id=”icons”>
<div class=”container”>
<div class=”row”>
<div class=”col-md-12″>
<ul class=”list-inline”>
<a href=”http://www.facebook.com” target=”blank”><li class=”list-inline-item”><i class=”fa facebook fa-facebook-square fa-3x” aria-hidden=”true”></i></li></a>
<a href=”http://www.instagram.com” target=”blank”><li class=”list-inline-item”><i class=”fa instagram fa-instagram fa-3x” aria-hidden=”true”></i></li></a>
<a href=”http://www.twitter.com” target=”blank”><li class=”list-inline-item”><i class=”fa twitter fa-twitter-square fa-3x” aria-hidden=”true”></i></li></a>
<a href=”http://www.google.com” target=”blank”><li class=”list-inline-item”><i class=”fa google fa-google-plus-square fa-3x” aria-hidden=”true”></i></li></a>
</ul>
</div>
</div>
</div>
</section>
The process to create a simple landing page with social icons using Bootstrap 4 is now complete.
Conclusion
An open source framework is a beneficial tool for creating interfaces and this guide for making a website with Bootstrap will be beneficial for users looking to create responsive web pages with an enhanced visual appeal.
About Author:
Brandon Graves is obsessive about WordPress and all the latest updates associated with it. He writes informative articles on various WordPress issues such as custom wordpress development, PSD to WordPress conversion, etc, for tech-savvy individuals. Follow him on Google Plus to get instant updates.


0 comments